Manual

Connect a capture card to start previewing HDMI.

With a USB-C capture card, Noir turns your device into a portable HDMI monitor. This manual explains how to connect your hardware and use the main preview, monitoring, and display tools in Noir.

Connect an HDMI device to a USB-C capture card, then connect the capture card to your phone or tablet running Noir.

Basic Setup

1. Connect HDMI to the capture card

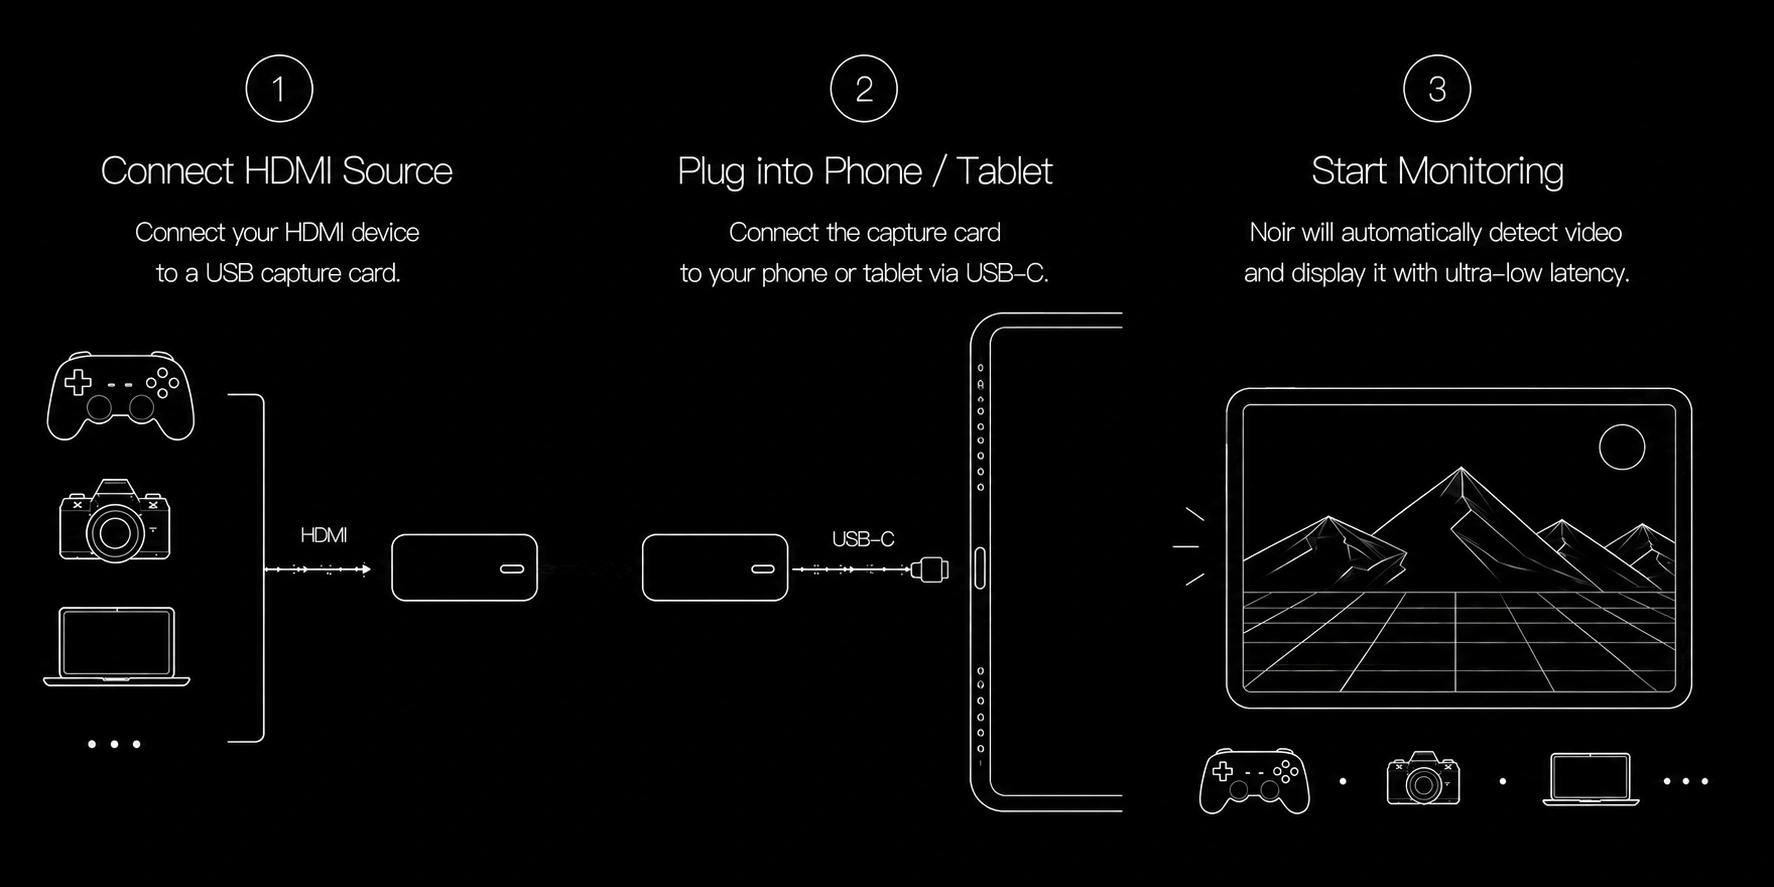
Plug your console, camera, laptop, or other HDMI source into the HDMI input on a UVC-compatible USB-C capture card.

2. Connect the capture card to your device

Use USB-C to connect the capture card to your Android device or iPad. For USB 3.0 capture cards, use a USB 3.0 cable and a USB 3.0-capable port.

3. Open Noir

Grant the required camera or USB device permission, select the capture device if prompted, and choose a supported resolution or frame rate when available.

Preview Controls

Video parameters

  • Select the video format, resolution, frame rate, and video range exposed by your capture card.
  • Android also supports color space selection: BT.601, BT.709, and BT.2020.
  • If the picture looks washed out or crushed, check the video range first.

Image adjustments

  • Adjust brightness, contrast, saturation, and hue for the live preview.
  • These controls affect how Noir displays the incoming video. They do not change the HDMI source or capture card output.
  • Use reset to return adjustments to the neutral state.

Display Tools

Stretch & Crop

  • Fullscreen fills the whole display.
  • Stretch scales the preview to a ratio: 21:9, 16:10, 16:9, 4:3, or 3:2.
  • Crop fills a ratio by trimming the image.
  • Anamorphic Lens expands squeezed footage with 1.33x, 1.5x, 1.6x, 1.8x, or 2x options.

Pinch to Zoom

  • Pinch the preview to inspect details up to 4x zoom.
  • Drag the preview after zooming to inspect a different area.
  • On Android, use Expand when it appears to return the preview to full view.

Composition overlays

  • Rule of Thirds overlays a 3x3 guide grid.
  • Center Marker marks the center of the frame.
  • Aspect Marker shows frame guides such as 4:3, 16:9, 1.85:1, 2.35:1, 2.40:1, 9:16, and 1:1.

Monitoring Tools

False Color

False Color maps processed preview brightness to colors, so video range and image adjustments can affect what you see.

  • Purple: below 5%, near black.
  • Blue: 5% to 6%, very dark detail.
  • Gray: 6% to 10%, 13% to 41%, 49% to 61%, and 71% to 92%.
  • Cyan: 10% to 13%, dark reference range.
  • Green: 41% to 49%, mid-gray reference range.
  • Pink: 61% to 71%, bright skin-tone / highlight reference range.
  • Tan: 92% to 94%, highlight warning.
  • Yellow: 94% to 96%, high brightness.
  • Orange: 96% to 99%, near clipping.
  • Red: 99% and above, extreme highlight / clipping warning.

Zebra

Zebra overlays diagonal stripes on top of the live image for two key brightness ranges.

  • Red stripes: 98% and above, highlights near clipping.
  • Green stripes: 41% to 49%, mid-gray reference range.

Edge Detection

Edge Detection highlights outlines and focus edges. Edge Detection Mix overlays detected edges on top of the live image. The overlay color can be green, red, or yellow. Lower thresholds reveal finer texture and noise; higher thresholds focus on stronger outlines.

Color Separation

Color Separation splits the same preview into channel views, making it easier to inspect red, green, and blue channels separately.

  • iPad: red, green, blue, and full-color views.
  • Android RGB Separation: red, green, blue, and full-color views.
  • Android RGB and Luma Separation: red, green, blue, and luminance views.

Histogram, Waveform, and Vectorscope

Histogram shows how image values are distributed from shadows to highlights. Waveform maps brightness against horizontal image position, which helps judge exposure across the frame. iPad also includes Vectorscope for checking color hue and saturation distribution.

Color and Look

3D LUT

Noir supports Cube 3D LUT files. On iPad, import LUTs from the 3D LUT settings page, then apply them from the toolbar. On Android, choose the folder where your LUT files are stored, then select a LUT from Visual Effect or the LUT toolbar button.

CRT effects

CRT effects simulate scanline and CRT-style rendering. Use them when you want a retro display look rather than a measurement overlay.

Platform Features

Instant Replay on iPad

  • Enable the Instant Replay toolbar button from Customize Toolbar.
  • Long press the Instant Replay button to turn recording on or off.
  • When Instant Replay is on, tap the button to save the latest clip to Photos.
  • Available durations are 30 seconds, 1 minute, 2 minutes, and 3 minutes.

Android tools

  • Picture-in-Picture keeps the preview visible while using other apps.
  • Screenshot saves the current preview frame to Pictures.
  • NDI Streaming can send the preview as an NDI source, and NDI Monitor can preview NDI sources on the network.
  • Super Resolution can use FSR for upscaling when the scaling ratio is appropriate.